
So far the dioramas have been the kids’ favorite part of our habitat unit studies. The arctic diorama that we made for our Polar Unit Study for preschoolers quickly became one of the kids’ favorite “toys”. They still play with it frequently!
This time the kids knew a little more about what was up with this diorama-making business and they were able to help a lot more than they had with the arctic diorama.
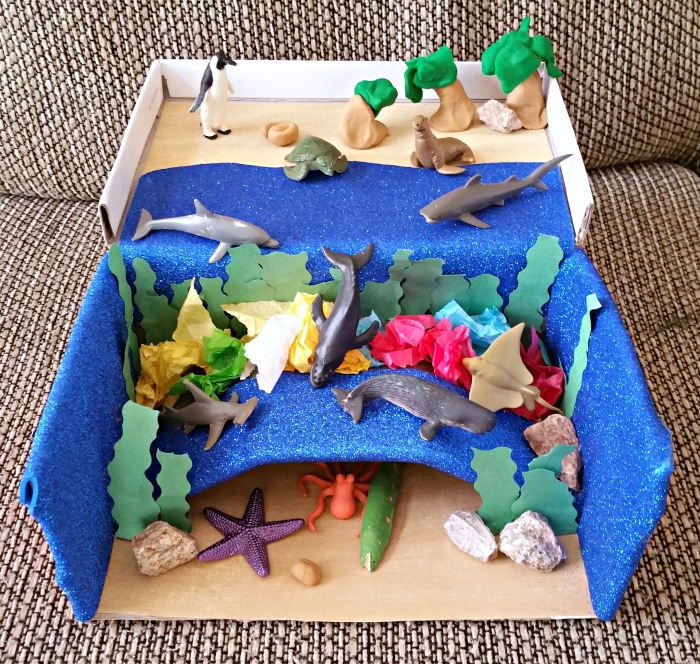
When it came to gathering supplies for our diorama we realized we were missing an important component: a shoe box! The kids and I visited two or three different local shoe stores and asked for empty shoe boxes that weren’t being used. We were gifted with stacks of boxes in various sizes. We picked out one for our ocean diorama and stored the rest for future projects.
Once we had a shoe box, here are the other things we collected (all of these things we had at home already but they can easily be found at craft stores):
Materials
- Foamies glitter foam sheets, blue
- Construction paper, sand-colored and green
- Tissue paper in various colors
- Rocks from outside, small
- Play-doh, sand-colored and green
- A glue gun (this gets hot- be careful around the kids!)
- Scissors (also use carefully around little kids)
- Glue
- Sandpaper
- TOOB ocean animals
Step 1: Cut the box to the desired shape
We decided to have two parts to our ocean diorama: under the water and above the water. The lid of our shoe box was the detached kind that lifts completely off, so we cut a long edge, folded it down, and hot-glued it onto one of the sides of the box to create an attached lid. Next, we cut the front side off of the shoebox.
The bottom part of the box would become under the ocean and the lid part would become our above-water part of the diorama.

Step 2: Support the lid
We took the front piece of the box that we had just cut off and glued it to the underside of the lid to help prop it up. This made it sturdy enough to support the decor and animals that were going to sit on it.

Step 3: “Sand”
Using our sandpaper, we gently scrubbed our sand-colored construction paper a few times to create a sandy-beach look. Then we glued our “sand” into our diorama with regular glue.


Step 4: “Water”
Our blue glitter Foamies sheets became water. The “water” basically covered all of the parts that didn’t already have “sand” glued on: part of the top, the backdrop, and the inside sides. I used the hot glue gun and did this part myself since the Foamies sheets are thicker than construction paper and needed a stronger binding than the regular glue. We chose to leave the outside of the box undecorated because we didn’t have enough blue glitter foam sheets to cover it all.
When the “water” was in place, we set up a few animals to see where we wanted everything to go in the diorama.

In the main part of the box, we created a shelf to represent different levels of the ocean and also as a spot to place more animals. We also cut our green construction paper into wavy strips to make seaweed. Little B watched while we worked from his high chair.


Step 5: Decorations
Crumpled up tissue paper became a coral reef. Rocks provided extra hiding places and props for the animals and seaweed. Play-doh was rolled into palm trees and shells to decorate the beach.


Our finished ocean diorama:
The best part about the whole project for this mama was seeing the pride the kids feel in their work!


If you like our diorama, share and pin!
Read more about our Ocean Unit Study for Preschoolers!


Pingback: Ocean Unit Study for Preschoolers | these good old days